Integrate Telegram With Your Django Site Using django-allauth
Note: if all you want is implementation notes, click here. Also, the information provided herein is not verified for accuracy and try any of this at your own risk and with an eye to all other sources of information.
Authentication Sources
The Internet started with a username/password authentication model. You register with a name that you’ll use on the site, you add a password, then you get access. This was the universal authentication model, used from the Internet standard, HTTP, as Basic Authentication, but it was what web sites used, too. For decades, all you needed to log in to virtually any web site were username and password.
That all changed as web sites became more important. A lot of users would try to use the same username/password combination on all sites, or would use easy to guess passwords. More and more accounts got compromised as a result, and a new security model was necessary.
The current standard requires two factors of authentication (hence, 2FA). The “factors” are categorized as “something you know,” “something you are,” and “something you own.” To successfully authenticate, you need to out of the three. For instance, your password is something you know, but your fingerprint is something you are. Something you own might be a security key, or more likely your email address.
The current gold standard of authentication is 2FA, and it’s usually what you’ll find for sensitive sites like banks or employers. They will generally require you to provide a password and a token, or respond to an email.
Email Authentication
If you don’t have a very sensitive site, like Konsente - where your personal connection to the data stored is non-existent - the old-style username/password would be perfectly fine.
At the same time, Konsente needs to be able to reach you when something new happens - like a meetup is scheduled or a new match request comes in that you need to respond to. So, in addition to username and password, you also need to provide some form of communication. The easiest and cheapest for all involved is email, so that’s what Konsente started out with.
But once Konsente requires you to provide a “something you own,” and since Konsente never displays your user name, anyway, does Konsente really need a username? Can’t it just use the email address as username? Even better, since the information stored is not sensitive, can’t Konsente just use your email to authenticate you?
Password Reset Authentication
You may have forgotten your password once or twice on a web site. Usually (when the information is not sensitive) the sites allow you to reset your password. They do that by sending you a message with either a reset link or a temporary password. This is usually an email, unless the site implements some special communication.
But now think through the logic of it: if you have a username and password, and when you want you can just use your email address to reset them both, what is the advantage of having an email and password? Can’t you just rely on the email for login, since the password can always be reset via email?
Konsente (with a large and growing number of sites) decided that’s exactly what we were doing. Your username is your email, and your password is the link that comes in the email. You don’t even get to pick a password, since we’d always ask you to confirm via email anyway, since a weak password would compromise you.
So, as long as you have access to your email account, your data is secured behind it. We send out both a link to click and a security code in email, because either one can be more convenient, but functionally we send you a one-time password in email, and regardless of whether you are registering or coming back, the flow is the same.
Additional Authentication Sources
All would be swell if people used email consistently. Sadly, that’s less and less the case, as email is becoming more and more bogged down by spam and marketing. People started paying less attention to their email inbox and moving to other communication channels. Those communication channels are also eagerly making sure communication over them is more exciting and feature-full than plain old email: the more crooks use email for evil, the more other communication sites push for ease of use and features.
One of the additional features provided by many sites is the ability to use your account on them to log in to other sites. To give one example, when you try to log in to wapo.com, you currently are asked to provide your email address, or to Continue with Amazon, Facebook, Google, or Apple.
When you choose one of those other sources, you are redirected to their sites, where you are either already authenticated or need to authenticate. When that has happened, you are sent back to the original site and logged in. Usually, you will choose one provider that you are already logged into because you use them constantly, so from your perspective, the log in to the other site translates to log in on this site. If you are an Amazon customer that is usually logged in, getting onto Bezos-owned WaPo.com is a breeze: you click on a link and are redirected after a confirmation.
This is so commonplace that there is a whole standard devoted to this passing back and forth of authentication credentials, called OAuth2. A large and growing number of sites offer OAuth2 both as providers (you log onto the site and other sites can piggy-back onto that log in) or clients.
You should know that, in OAuth2, the clients receive a set of credentials and information about you - maybe your username on the other site, maybe your email address, etc.
Communicating Over Additional Sources
Authentication itself is not that hard to provide - you just need email. OAuth2 is much more useful if, in addition to a source of authentication, the site provides a destination for communication. That is, if you can replace email with communication on the provider site, you don’t need email, at all.
That’s not always the case, as the particular provider might not offer a means of communicating. For instance, in the example above, Amazon makes sense as an authentication provider (since Bezos owns both Amazon and WaPo and more people use Amazon than subscribe to WaPo), but you can’t really communicate on Amazon. In fact, in general Amazon relies on email for communication.
Of the other options, though, all of Facebook, Google, and Apple provide communications facilities. The question is whether they allow communication over those facilities using the OAuth2 credentials passed.
Telegram Authentication and Communication
Telegram is sort of a struggling actor when it comes to authentication and communication. Not as glitzy as the likes of Snapchat or as widespread as Whatsapp, Telegram tries harder to work with everyone. As a result, it’s relatively easy to find documentation about Telegram integration, and the projects that target Telegram as a platform can count on a consistent API. Telegram, unlike other providers, is trying to grow more than extract, and as a result is much less likely to try to block other providers.
The architecture of automated communication on Telegram’s network is built around bots. Bots are automated messengers that talk to each other or to humans, usually in response to a request by a human. Imagine a dictionary both that you connect to and ask about the definition of a word. You send a word, it replies with the definition.
Bots can do all sorts of useful things: you could get the time table information from your bus provider, you could get specials from your local restaurants, you can ask for the weather. In fact, Telegram’s bot site even explains that you can do entire ordering sites on a bot!
Telegram also provides OAuth2 to authenticate you. Telegram is a pretty good actor when it comes to authentication: it allows you to get onto many different devices at the same time, but it always informs you of attempts to log in somewhere else. This is in contrast to sites that allow you to be logged on only on one device at a time, or that log you onto any number of them but don’t tell you.
Django’s authentication system is very old-school. It only knows about username/password/email and no other authentication sources. It only allows the standard registration and authentication flow. Worse than all that, it doesn’t even come with templates for all those things, not even basic ones with no styling. You are left to figure out what and how to authenticate by going to a project that has a full set of templates and using them as prototype for your own.
There are a number of projects that sprung out of this sparsity. The probably strongest and most complete of them is django-allauth. It’s a project that has been around since 2010, created by Raymond Penners. But you might want to check out other, similar projects like social-auth-app-django and more.
Django-allauth, as the name implies, takes over all of authentication, optionally: you can delegate as many authentication tasks as you want to django-allauth, or as few.
There is a part of allauth that deals with regular username/password/email registration and authentication. It also includes support for 2FA. I am not going to describe either of that here, because it’s beyond the scope of Konsente registration. But the list of social apps that allauth supports is incredibly impressive and includes Telegram, which we want to implement.
Python Telegram Bot
As mentioned, we didn’t just want the authentication component. We also wanted to send messages/notifications to users. Users can always turn off notifications from Konsente from the Settings page, but we also want them to be able to be informed when something new happens. We never want to force people to be constantly logged on to see whether something happened that affects them.
To use Telegram with Django, we need to create a bot that matches our site, and then communicate. That’s done using the project, python-telegram-bot Another open source project, this one also is mature and powerful.
Issues
Let me start with the problems encountered, since you are possibly going to stumble upon the same things.
The first one is documentation. Like many large open source projects, django-allauth suffers from poor documentation. In the particular case of django-allauth and Telegram, all the specifics I could find at time of writing was this:
To compound the problem, Telegram documentation was not a lot better. You were told what to do in great detail, but there was nothing that told you what errors you could encounter and how to remedy them.
That’s the original reason for this article: it wants to provide more detailed documentation of what to do and how for the combination Django/django-allauth/Telegram/python-telegram-bot.
In particular, it seems that our use case is still not dominant and that the main problems in the documentation come from a focus on different ways of doing things. So, if what you want is the same as what we want (authenticate and communicate using Telegram identities), then follow along.
Step-By-Step Process
1. Create Telegram Bots
This part is a piece of cake. Just follow the instructions on Telegram’s documentation site. Basically, from the account you want to create the bot on (your account, not the bot’s account), you send the /newbot message to the @BotFather account. That will guide you through a process. At the end of it, you’ll get the most important piece of information: the bot token.
The bot token itself is composed of two parts, separated by a colon. The first part is your bot ID, a pure number. The second part is the secret (in Base64 encoding or something similar).
You should create two bots. One to use for development, one for production. That’s because in the django-allauth implementation, django uses a callback, and as a result the bot needs to know where calls are coming from and where they are sent to.
Imagine that you want to implement Telegram bot functionality on example.com. Then you want the bot to only accept login requests coming from example.com and redirect them to example.com for confirmation. Since your development environment will not generally point to example.com, it’s better to have two bots, or you’ll have to change the domain every time you move from development to production.
As part of creating the bots, add an image using the /setuserpic command (to @BotFather) and the domain using /setdomain. The process is interactive and asks for the information needed.
Note that the only way we could get the domain to work in development was to set it to http://0.0.0.0:8000/accounts/telegram/login/callback/. Any other domain (e.g. using localhost, or 127.0.0.1, or any URL other than the one mentioned) failed to produce a full flow.
2. Install django-allauth
Note: this presumes you are adding django-allauth to an existing Django project. If you do not have a Django project already, follow the tutorial to create one, or download an existing open source project. You are much better off starting with the project and familiarizing yourself with Django and then add django-allauth functionality than trying to do all at once.
Go into your Django environment and add allauth by typing pip install django-allauth.
Note that if you use docker or other virtualization, you need to add django-allauth to your requirements.txt file.
3. Configure django-allauth
The configuration of django-allauth consists, in our case, in the general configuration of the package and the specific configuration of the provider we want, Telegram.
The general configuration is described here. It involves adding allauth specific settings to the general configuration file, settings.py, and adding the allauth URLs to the urls.py file for the project.
Follow these instructions closely. They are not too hard to implement, especially if you know your way around Django in general. Notice that in the general instructions, you are asked to add an incredibly long list of provider accounts. For our purposes, the only one that matters is allauth.socialaccount.providers.telegram. You can include other ones, but unless you also configure their parameters, it won’t do much good.
One thing mysteriously not mentioned in the above configuration quickstart is that you need to add the SITE_ID parameter to the settings. It seems to matter little which ID you use, so maybe SITE_ID=1 is a good start.
Due to our specific configuration, we also needed to add the line, SECURE_PROXY_SSL_HEADER = ('HTTP_X_FORWARDED_PROTO', 'https') to our settings. That may be necessary or not for your configuration.
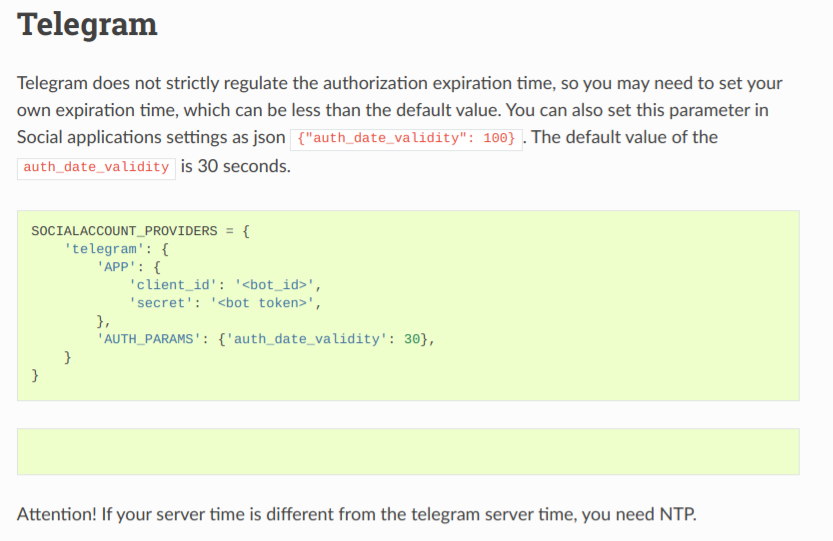
4. Telegram-specific Settings
The configuration of the Telegram social app is very simple. All you need to do is add the section:
SOCIALACCOUNT_PROVIDERS = {
    'telegram': {
        'APP': {
            'client_id': '<client_id>',
            'secret': environ.get('DJANGO_SECRET_TELEGRAM', '<client_id>:<secret>'),
        },
    },
}
to your settings file. The client ID is the numeric part of the token you got from @BotFather, while the secret is the entire token (including ID and colon). Please notice that, while the client ID is not particularly sensitive, the secret very much is. As such, you should treat it with the same respect and reverence as any other secret in your settings. Here, it is set from the environment variable DJANGO_SECRET_TELEGRAM, which necessitates an import environ at the beginning of the settings file. The only reason there is a default set here is to highlight the syntax used. You should not add the production token to the settings file.
Also notice that if you created two bots, you should determine which one to use here, by changing the environment or by using if statements:
if DJANGO_PRODUCTION:
    SOCIALACCOUNT_PROVIDERS = {
        'telegram': {
            'APP': {
                'client_id': environ.get('DJANGO_UID_TELEGRAM', '<client_id_prod>'),
                'secret': environ.get('DJANGO_SECRET_TELEGRAM', '<client_id_prod>:<secret_prod>'),
            },
        },
    }
else:
    SOCIALACCOUNT_PROVIDERS = {
        'telegram': {
            'APP': {
                'client_id': environ.get('DJANGO_UID_TELEGRAM', '<client_id_dev>'),
                'secret': environ.get('DJANGO_SECRET_TELEGRAM', '<client_id_dev>:<secret_dev>'),
            },
        },
    }
Note that this presumes you defined a variable, DJANGO_PRODUCTION, that is set to True if the system is in production mode.
5. Configure urls.py
This one was already mentioned. You need to add the line path('accounts/', include('allauth.urls')), to the list of URL patterns in your urls.py file. Notice that each app generally has a urls.py file, and you are asked to put the line into the master urls.py for the project, not that of any dependent apps.
6. Configure the Login Template
You can style your login template however you want! All it needs to add is the line {% load socialaccount %} somewhere at the top, so that the template tags for social accounts are recognized, and then somewhere else the link for the telegram account in the form of {% provider_login_url "telegram" %}. This is a redirect, so a button with a link target or a plain anchor tag will work. (E.g. <a href="{% provider_login_url "telegram" %}">Login with Telegram</a>) As mentioned, you can style the login however you want.
Telegram itself provides a nifty widget that you can generate and copy to your template interactively. Some users reported that this is the only thing that worked for them. We, on the other hand, found that the widget doesn’t like interacting with Vue/Vuetify components and simply gets swallowed. Because we had no issue with the original Telegram link from allauth, we stuck with it.
7. Sending Messages
Once users have authenticated via django-allauth and Telegram, their user accounts will have a field, socialaccount_set. This doesn’t set the social accounts, but is a set of social accounts. That’s because django-allauth makes the assumption that a user could have a whole slew of different socials.
To send a message, you first have to install python-telegram-bot. Read the section above regarding django-allauth installation for details, in particular using pip install and adding python-telegram-bot to your requirements.txt.
How do you connect with a Telegram user? If you read the documentation on bots, it tells you that the users need to first have connected with your bot. That’s not the case here, since the users already granted permission to receiving messages as part of the signup process.
As a result, you can simply loop through the social accounts registered for a user and directly send a message. In practical terms, this looks like:
def send_via_telegram(user, message):
    socials = user.socialaccount_set.all()
    tg = list(filter(lambda s: s.provider == 'telegram', socials))
    if tg.length > 0:
        bot = telegram.Bot(settings.SOCIALACCOUNT_PROVIDERS['telegram']['APP']['secret'])
        asyncio.run(bot.send_message(tg[0].uid, message))
It takes a short while to set up the bot object, so you may want to cache it somewhere. Also, don’t forget to import telegram.
Also, you should implement a way to receive messages from the user and forward them to someone that can interact with them.